d i d y o u kn ow ?
by jeff boyer
Sonar GPS Workshops LLC
Zoom, Zoom, Zoom!
T
he sonar zoom feature has been around
as long as liquid crystal displays, but still
today, many are not using it to its fullest
advantage. Most just hit the zoom button for a closer look and let it roll, while some may use
a split screen zoom view, but again, make few
adjustments after that. if you’ll take the time to
understand some basic zoom functions, you can
develop a strategy for knowing which zooming
approach is best and when to use it.
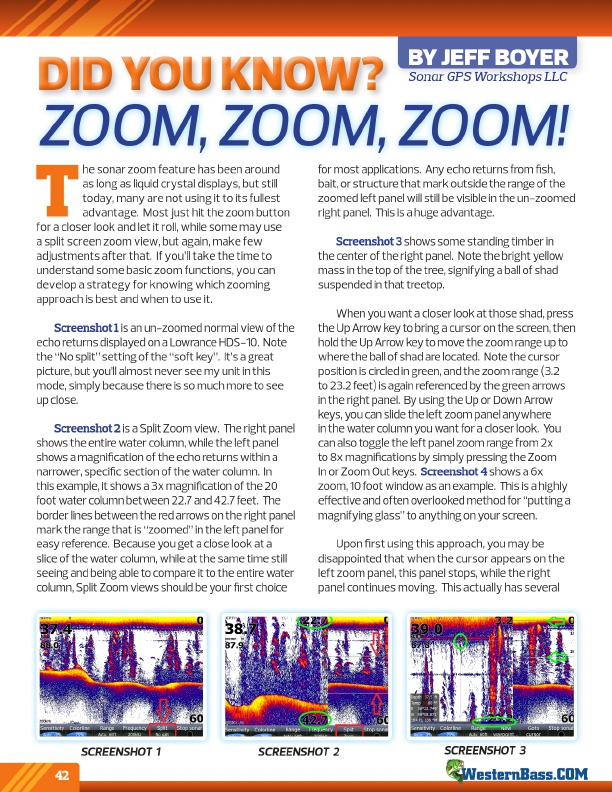
Screenshot 1 is an un-zoomed normal view of the echo returns displayed on a lowrance HdS-10. Note the “No split” setting of the “soft key”. it’s a great picture, but you’ll almost never see my unit in this mode, simply because there is so much more to see up close.
Screenshot 2 is a Split Zoom view. The right panel shows the entire water column, while the left panel shows a magnification of the echo returns within a narrower, specific section of the water column. in this example, it shows a 3x magnification of the 20 foot water column between 22.7 and 42.7 feet. The border lines between the red arrows on the right panel mark the range that is “zoomed” in the left panel for easy reference. Because you get a close look at a slice of the water column, while at the same time still seeing and being able to compare it to the entire water column, Split Zoom views should be your first choice
for most applications. any echo returns from fish, bait, or structure that mark outside the range of the zoomed left panel will still be visible in the un-zoomed right panel. This is a huge advantage.
Screenshot 3 shows some standing timber in the center of the right panel. Note the bright yellow mass in the top of the tree, signifying a ball of shad suspended in that treetop.
When you want a closer look at those shad, press the Up arrow key to bring a cursor on the screen, then hold the Up arrow key to move the zoom range up to where the ball of shad are located. Note the cursor position is circled in green, and the zoom range (3.2 to 23.2 feet) is again referenced by the green arrows in the right panel. By using the Up or down arrow keys, you can slide the left zoom panel anywhere in the water column you want for a closer look. You can also toggle the left panel zoom range from 2x to 8x magnifications by simply pressing the Zoom in or Zoom out keys. Screenshot 4 shows a 6x zoom, 10 foot window as an example. This is a highly effective and often overlooked method for “putting a magnifying glass” to anything on your screen.
Upon first using this approach, you may be disappointed that when the cursor appears on the left zoom panel, this panel stops, while the right panel continues moving. This actually has several
sCreeNsHOT 1
42
sCreeNsHOT 2
sCreeNsHOT 3